Send Handwritten Cards from Hubspot Workflows
Using IgnitePOST, you're now able to integrate real pen & handwritten notes into any Hubspot workflow. We put together this simple step by step guide to walk you through the process of triggering a handwritten card directly from a Hubspot workflow.

.svg)


HubSpot Workflows are a powerful tool that makes nurturing your leads, customize your customer journey, or managing your sales pipeline incredibly easy. Workflows provide the ability to execute marketing actions automatically, and in less time. They allow you to easily customize, visualize, and personalize the experience you give your contacts so that you can convert them into leads or convert leads into customers.
Using IgnitePOST, you're now able to integrate real pen & handwritten notes into any Hubspot workflow. We put together this simple step by step guide to walk you through the process of triggering a handwritten card directly from a Hubspot workflow.
1. Start on your IgnitePOST Dashboard. We'll begin by creating a Letter Template on IgnitePOST, which you can then trigger from any point in a Hubspot flow. Click on the 'Letter Templates' link at the top of the dashboard and then click on the button that says 'Create Letter Template'

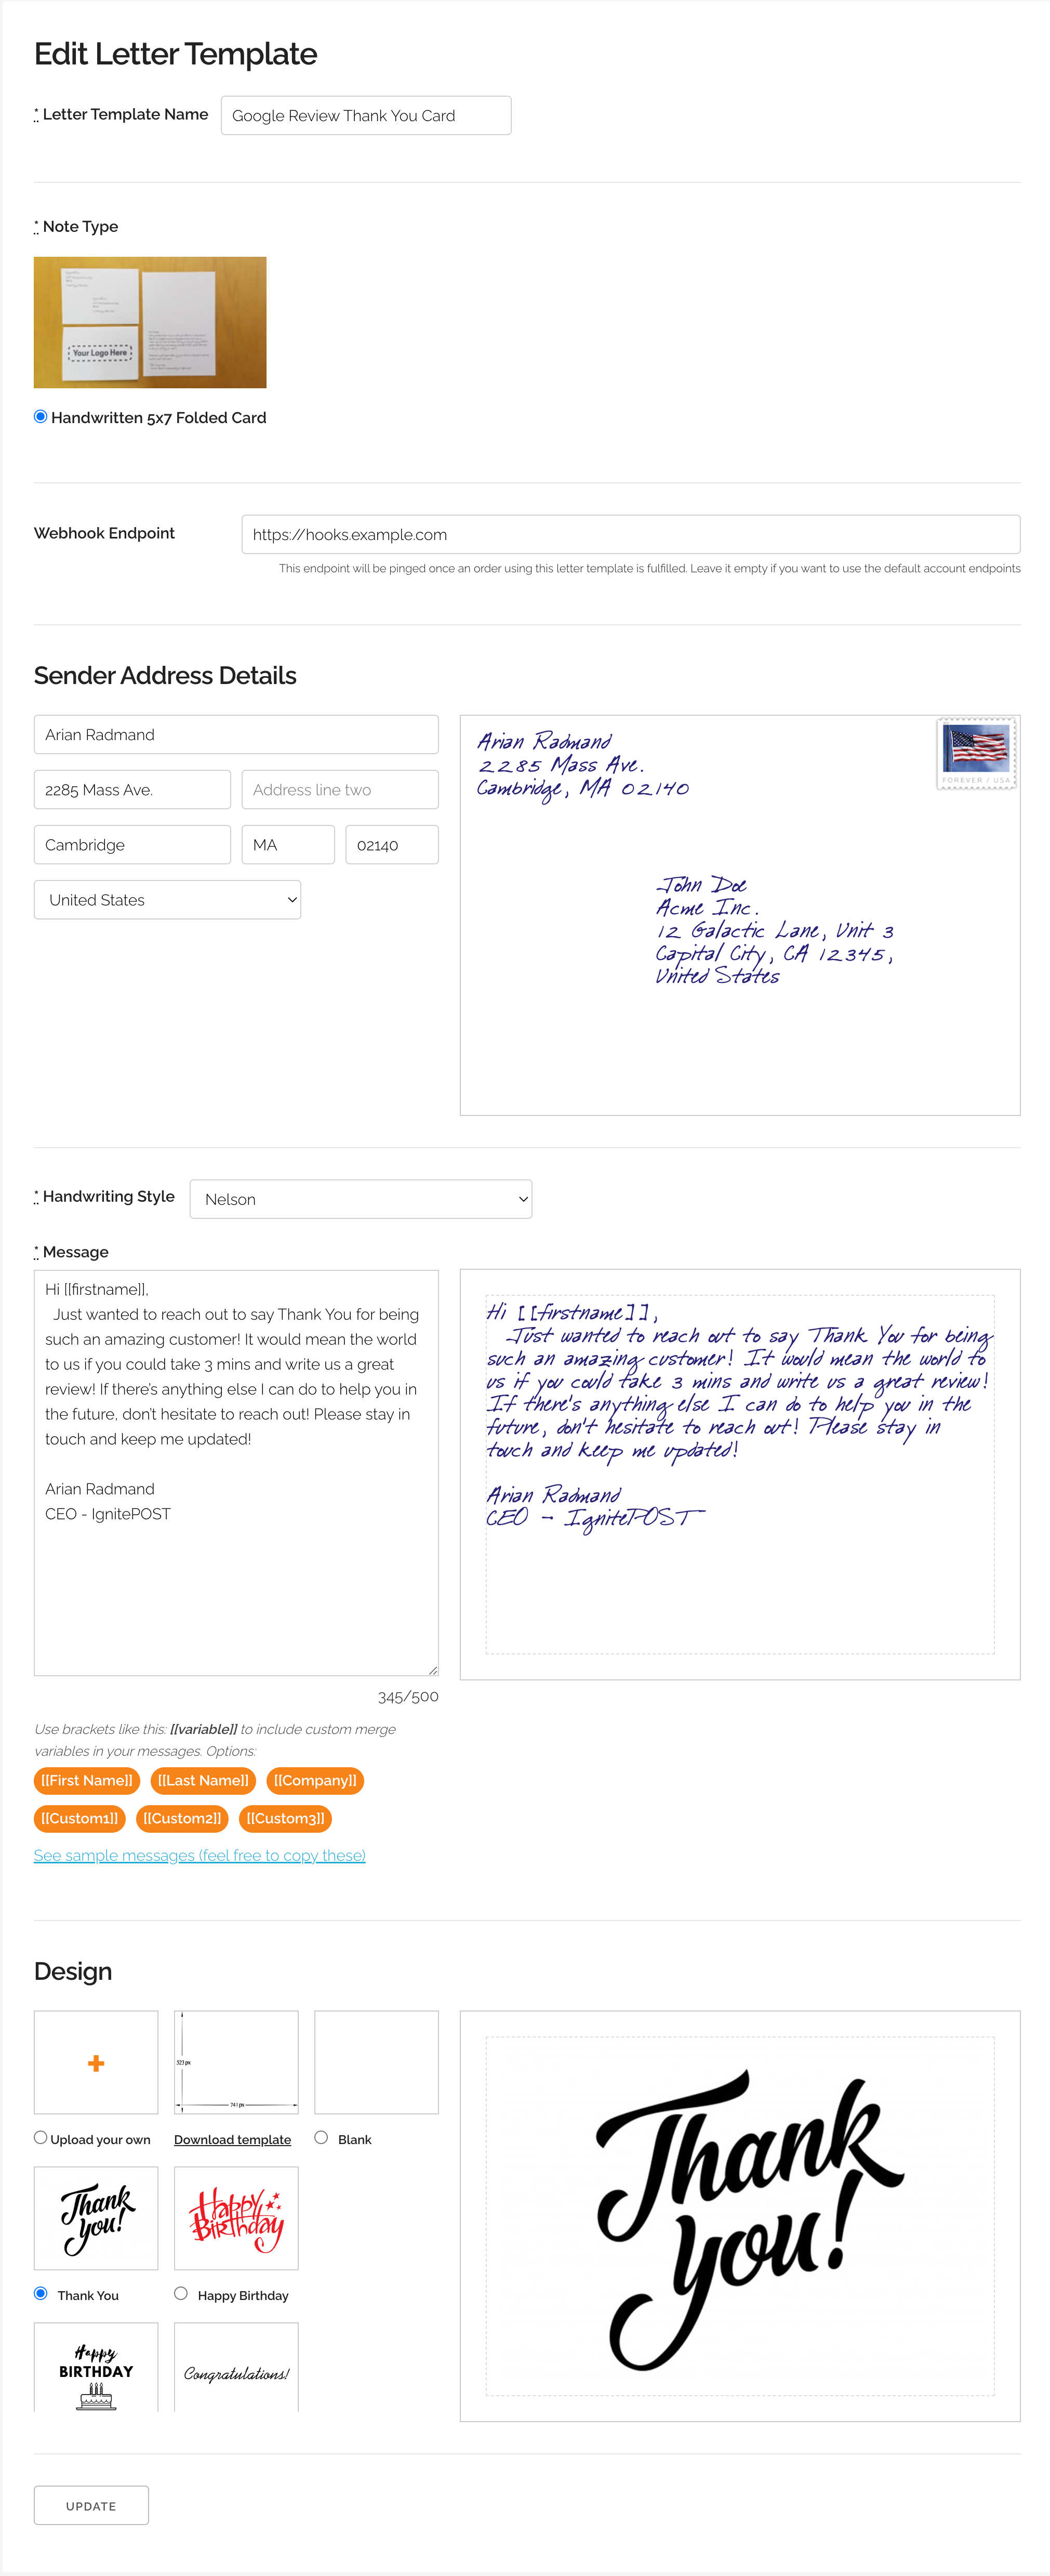
2. Next, set up the letter template you would like to trigger. Give your template an easy to remember name (In this example, we'll be triggering a handwritten note to request a Google Review from the user, so we've named our template 'Google Review Thank You Card'.
Similarly, fill in the Sender Address details, type out the message you want to send, as well as upload any image you wish to use for the front of the card.
We recommend using our card designer to write out your message as well as select the handwriting style you prefer. This allows you to preview how your card will look when it is written.
When you're satisfied, click the 'Create' or 'Update' button at the bottom.
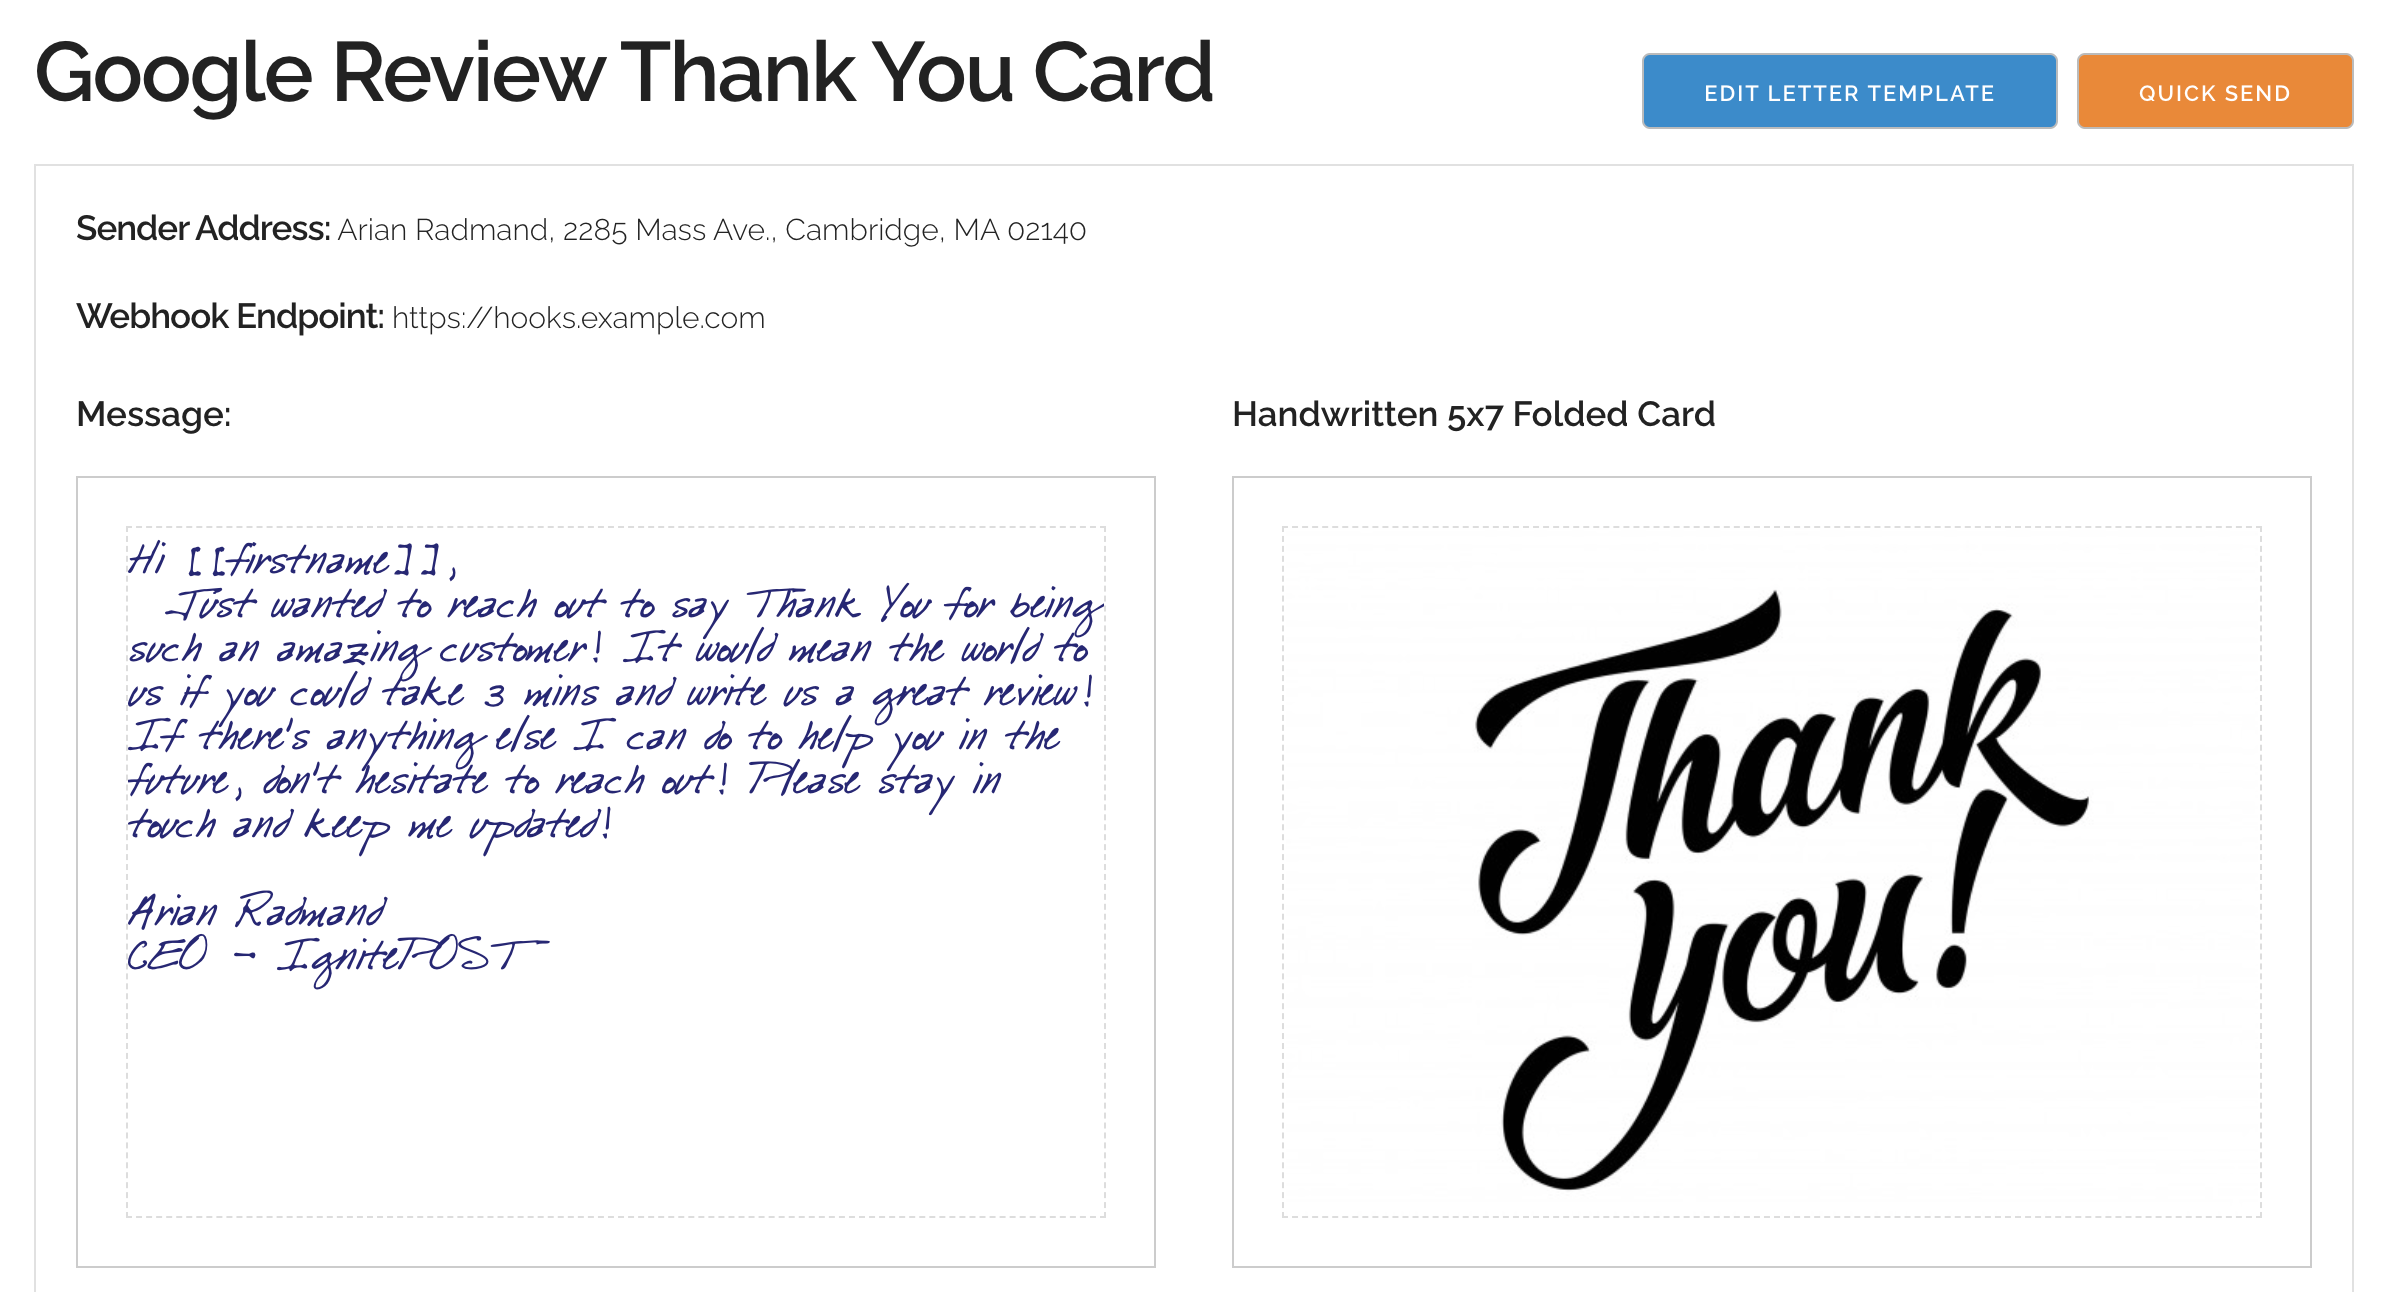
Your saved Letter Template:
3. Now that you have created a Letter Template, let's head over to your Hubspot flow, where we will trigger the card. Pull up your Hubspot dashboard and navigate to the flow where you wish to send your handwritten letter.
In the Hubspot flow, find the location where you want your handwritten card triggered, and click the plus (+) symbol to add an action.
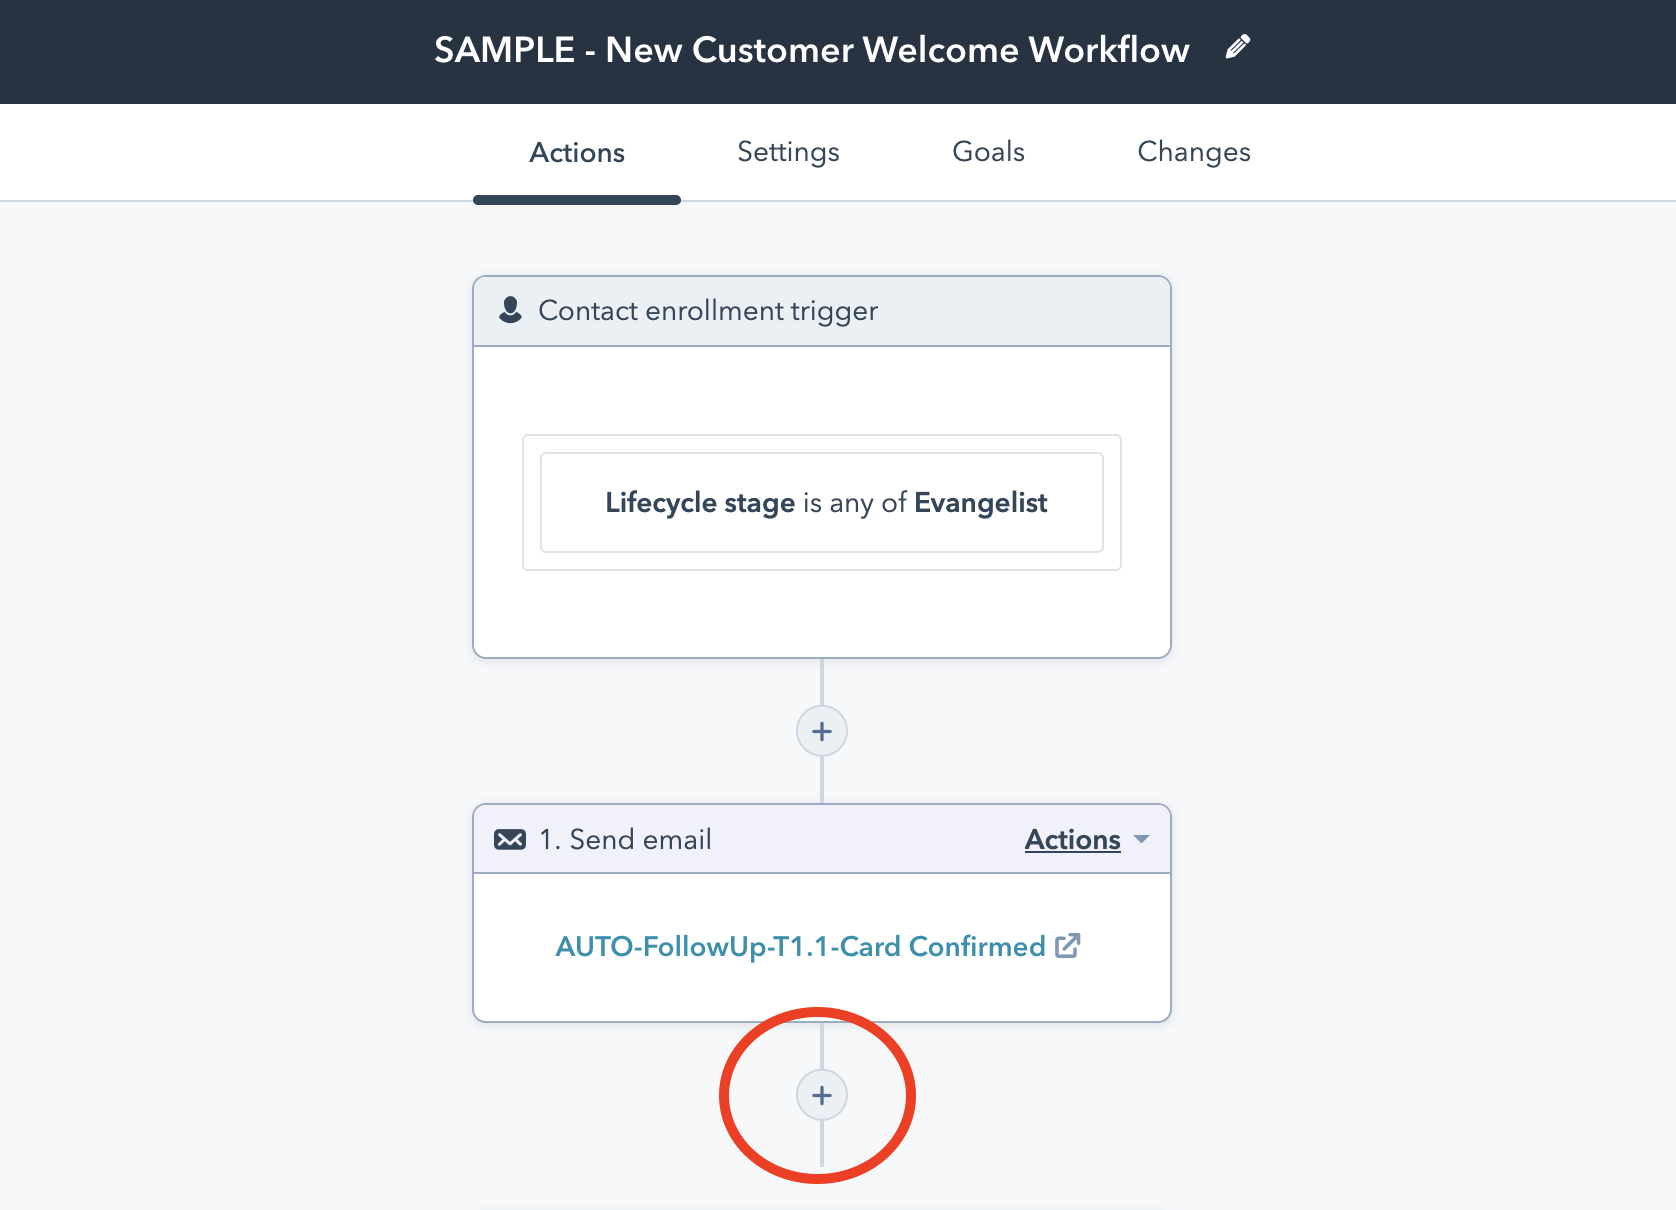
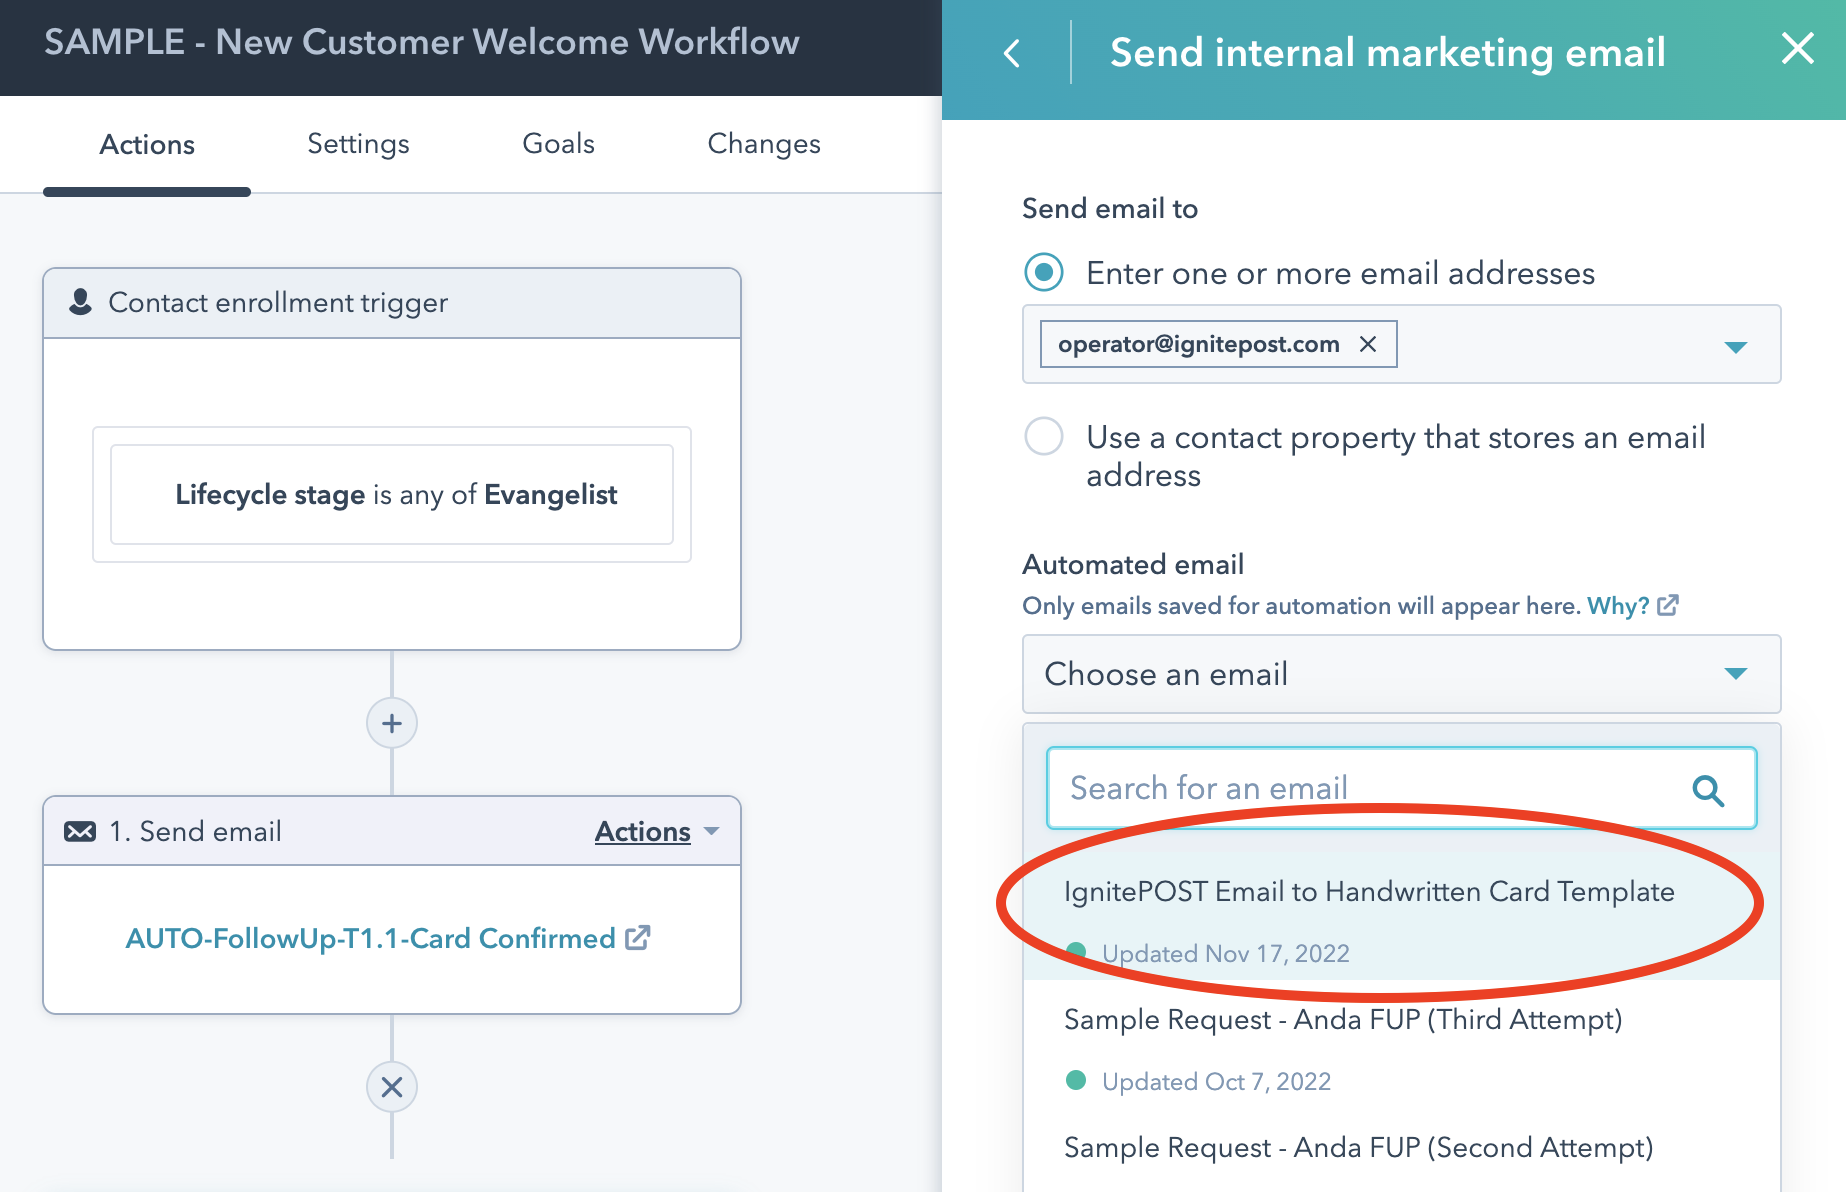
4. In the window that appears on the right, select 'Send Internal Marketing Email' as the action.
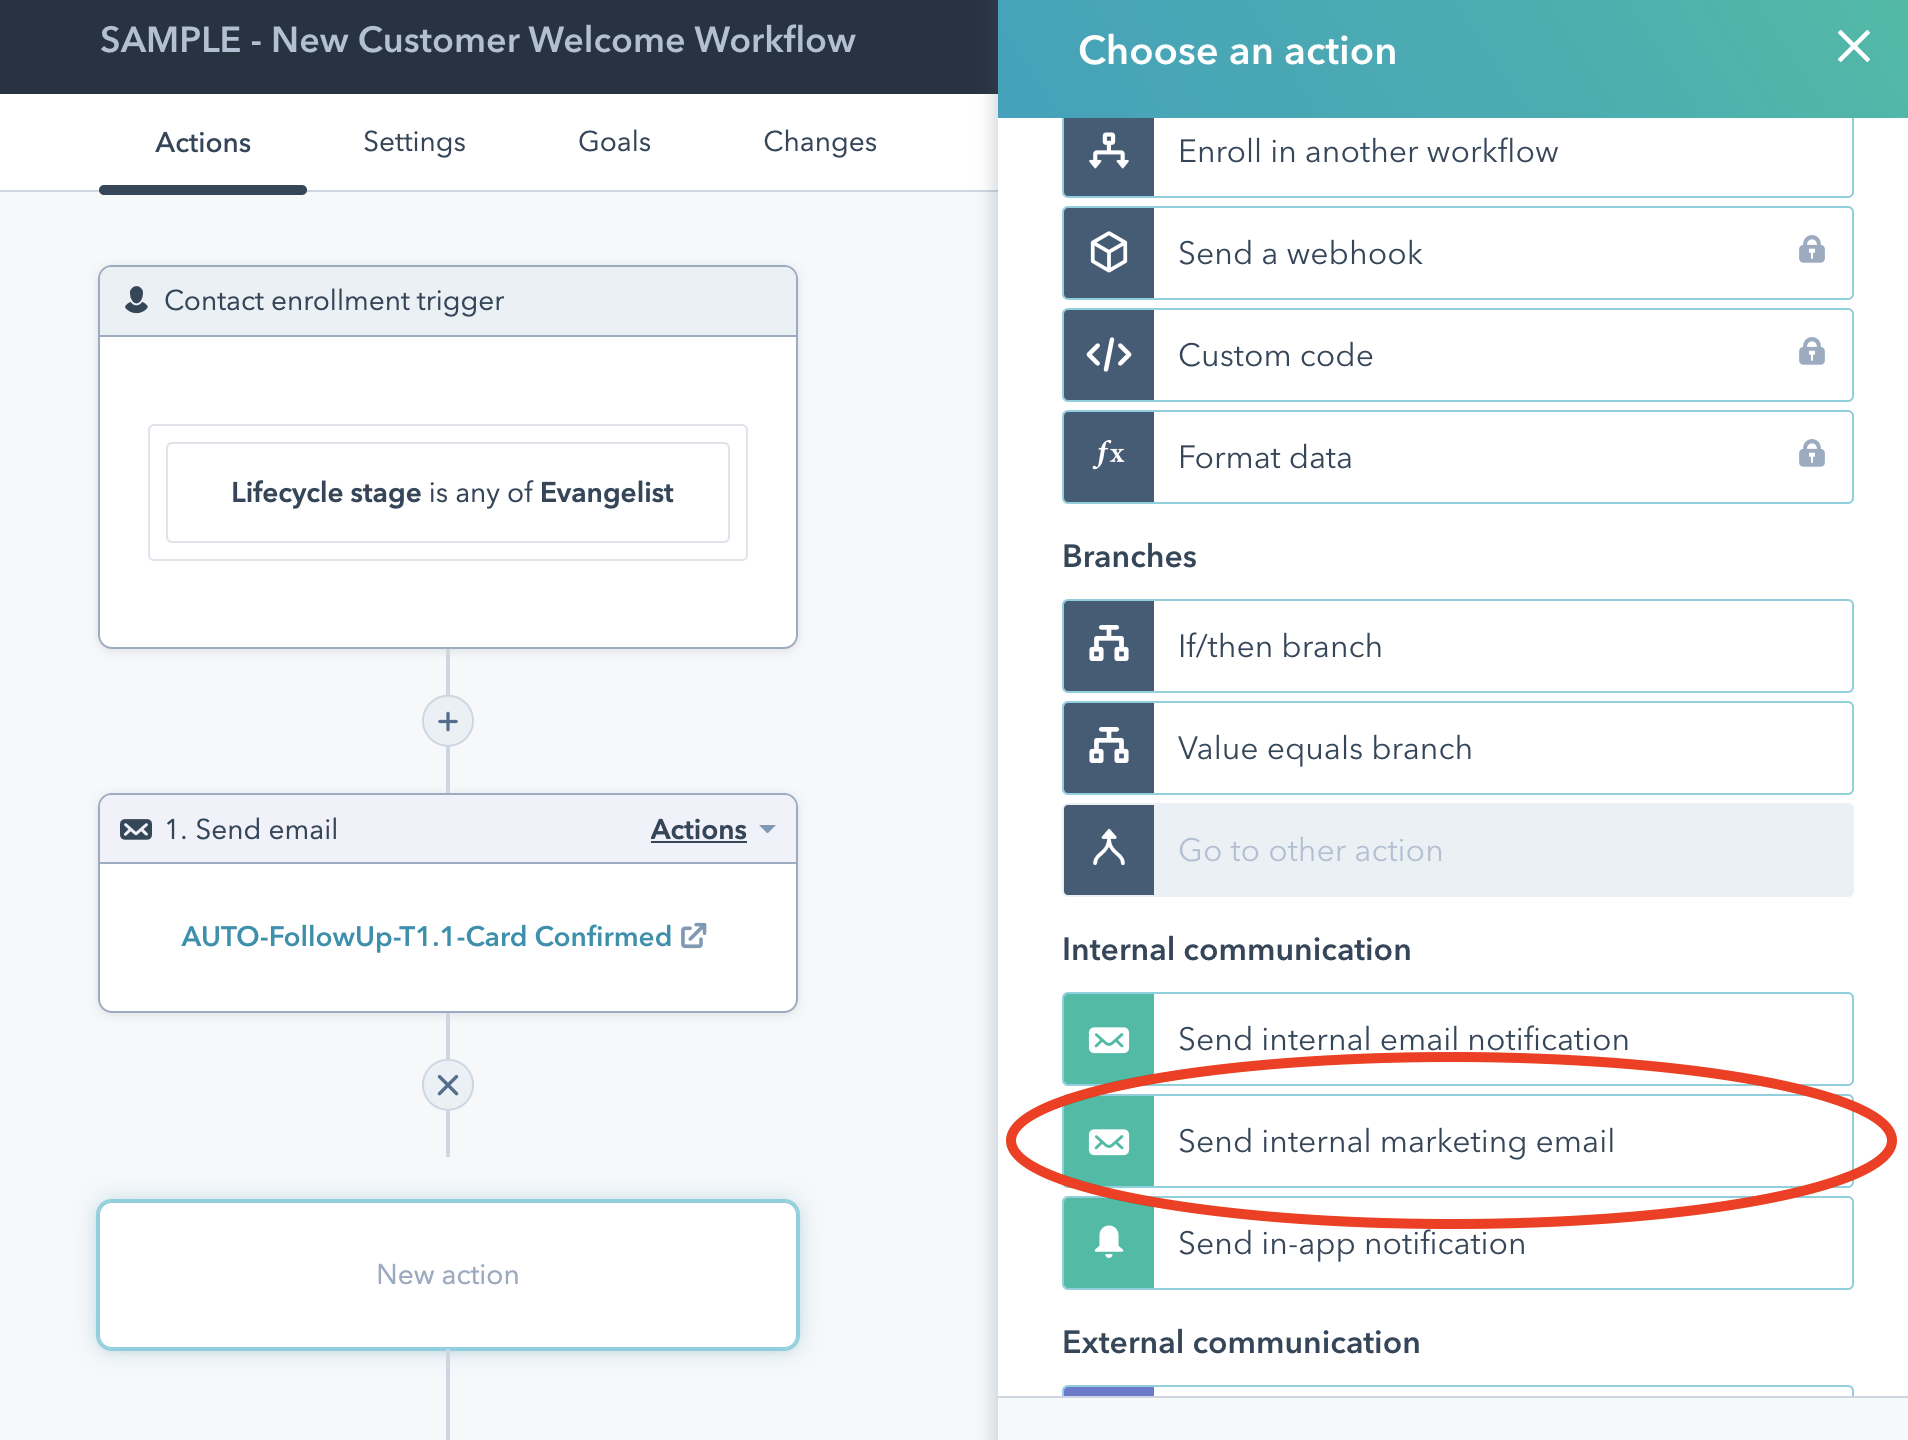
5. Next, we'll set up a marketing email template to send to IgnitePOST's Operator Bot, which will allow this action to trigger a handwritten card. In the image below, we already have this template set up in Hubspot, so we just select it as the action.
If you don't have this template saved in Hubspot yet, read on below and we'll walk you through the set up.
If you don't have the handwritten card email template saved in Hubspot yet, it's simple to create one.
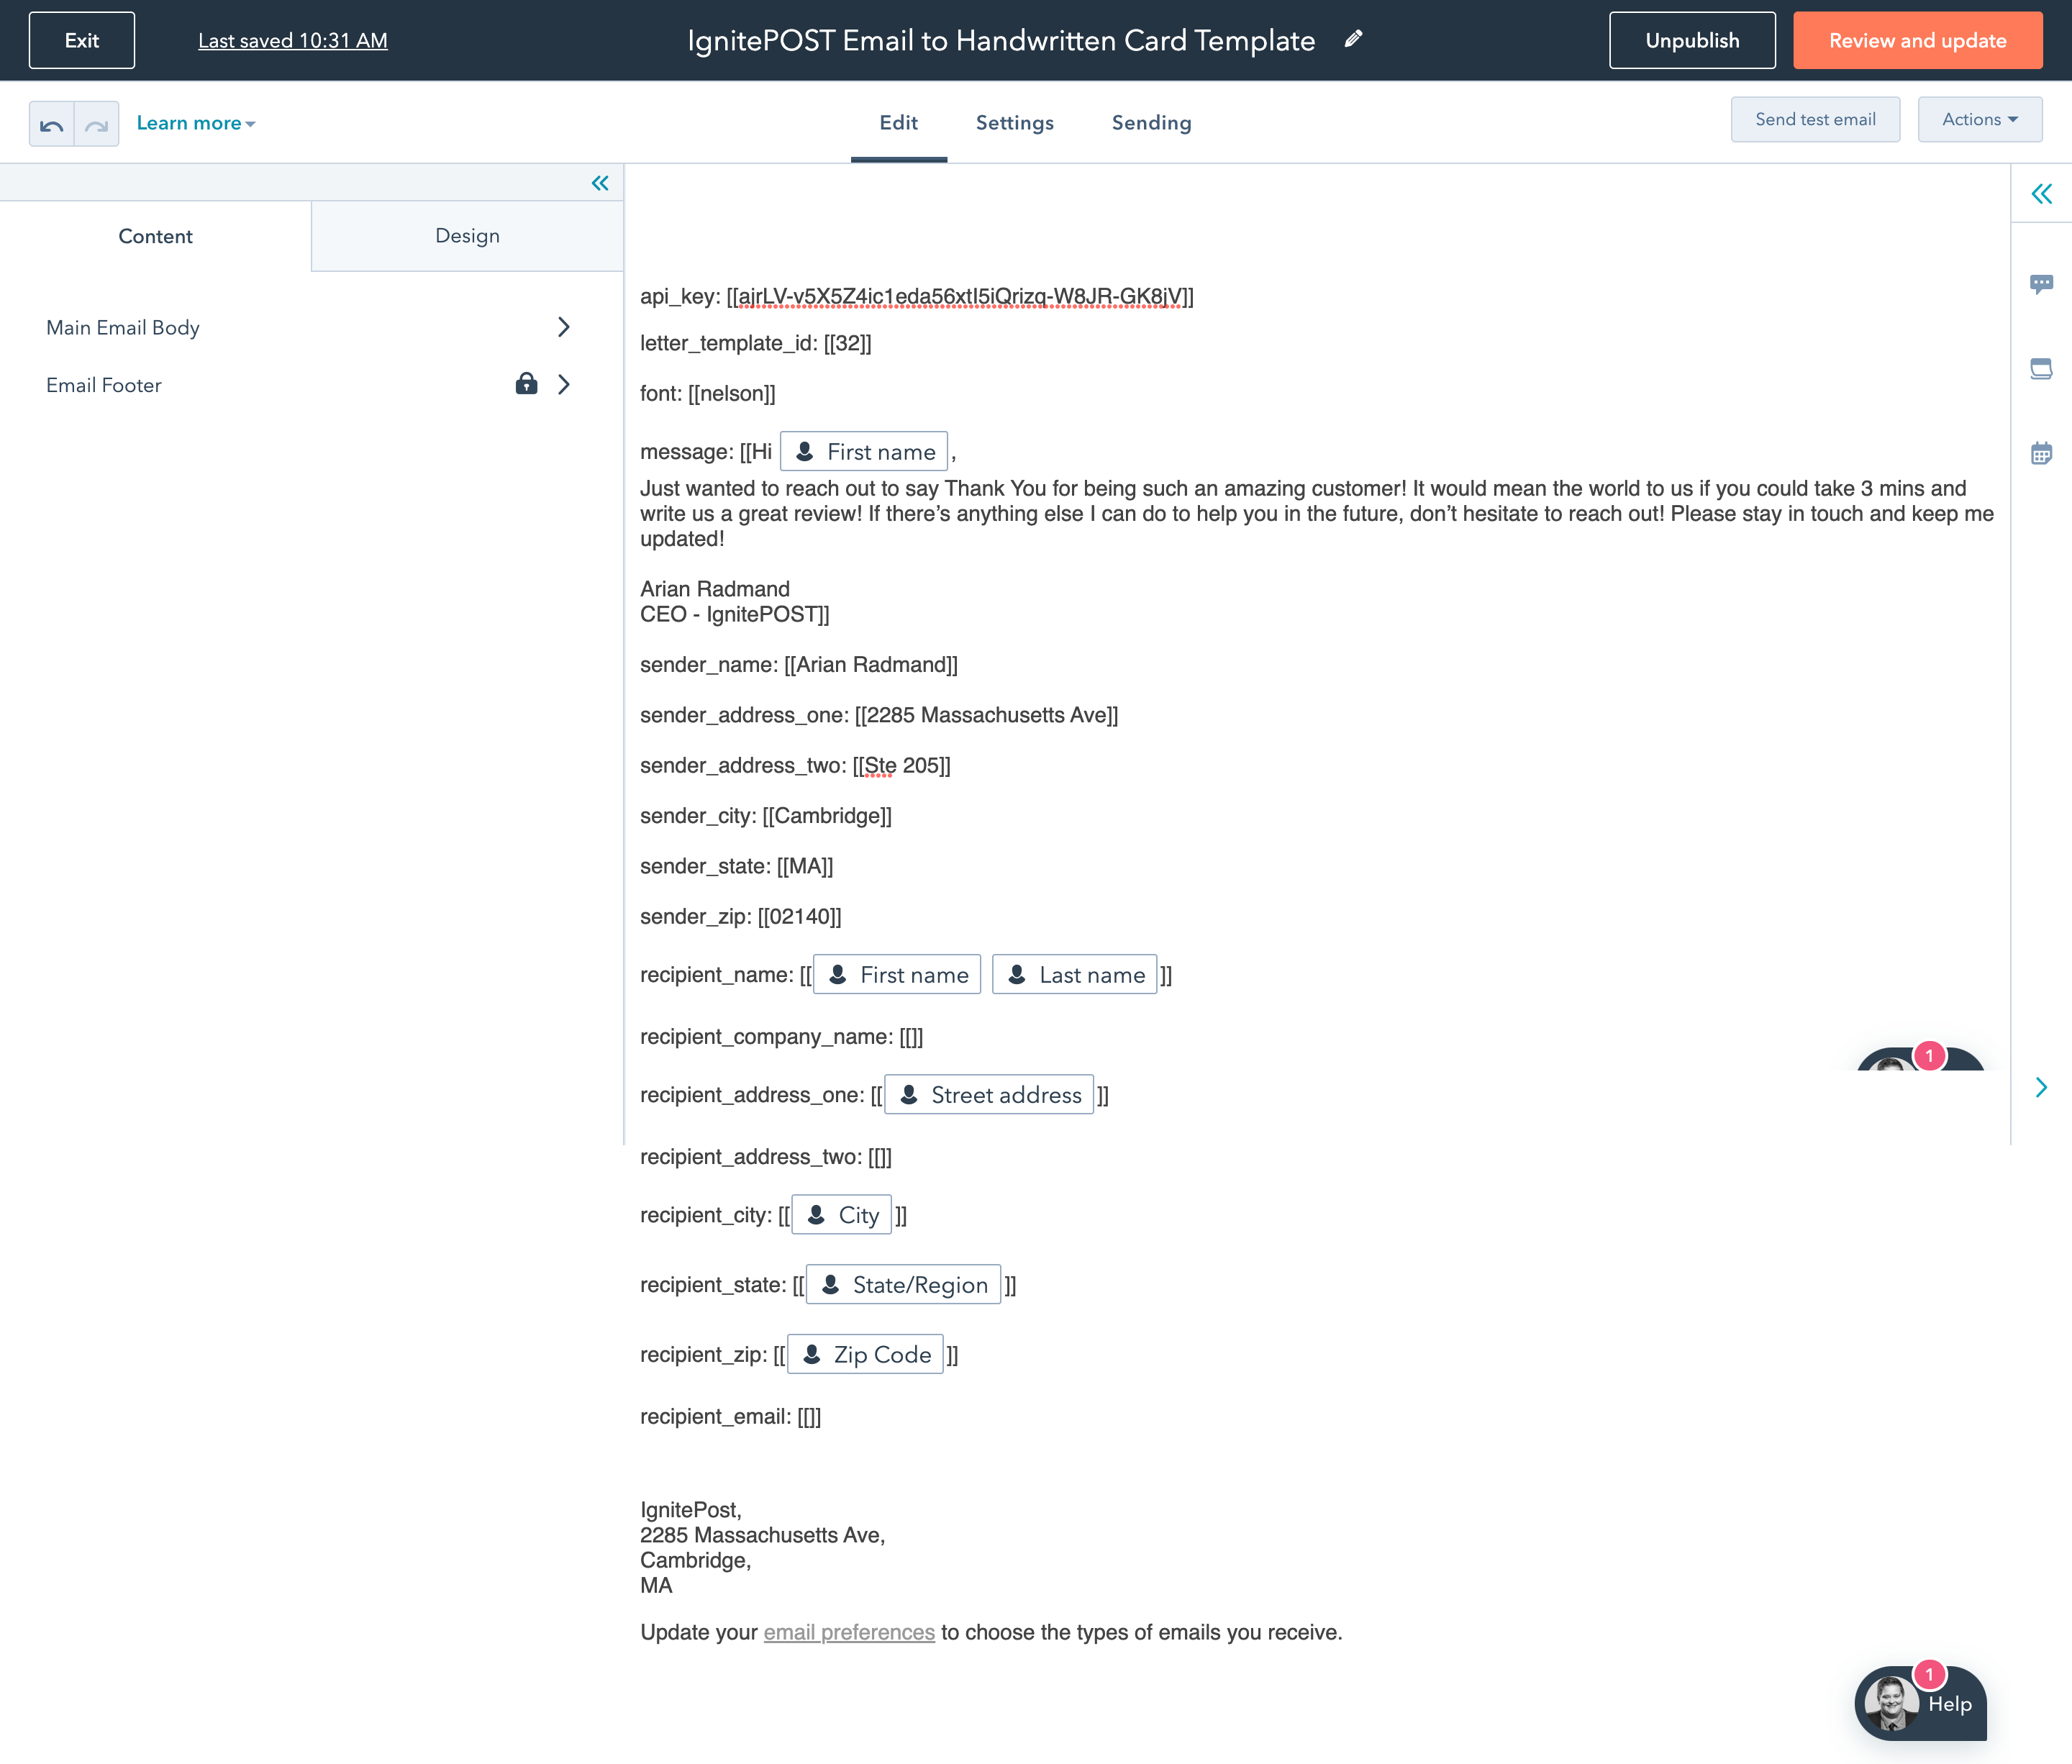
To set up the handwritten card email template to trigger in this action, simply create a new marketing email template.
It's easiest if you start from scratch and select 'Plain text email'.
On the email template setup screen, copy and paste the below content into the email body.
Pro tip: When you paste the content below into Hubspot, right click and select 'Paste and Match Style' to avoid formatting issues.
Now that you have the content of the email template, you need to edit the fields so that IgnitePOST knows what Letter Template you're trying to trigger:
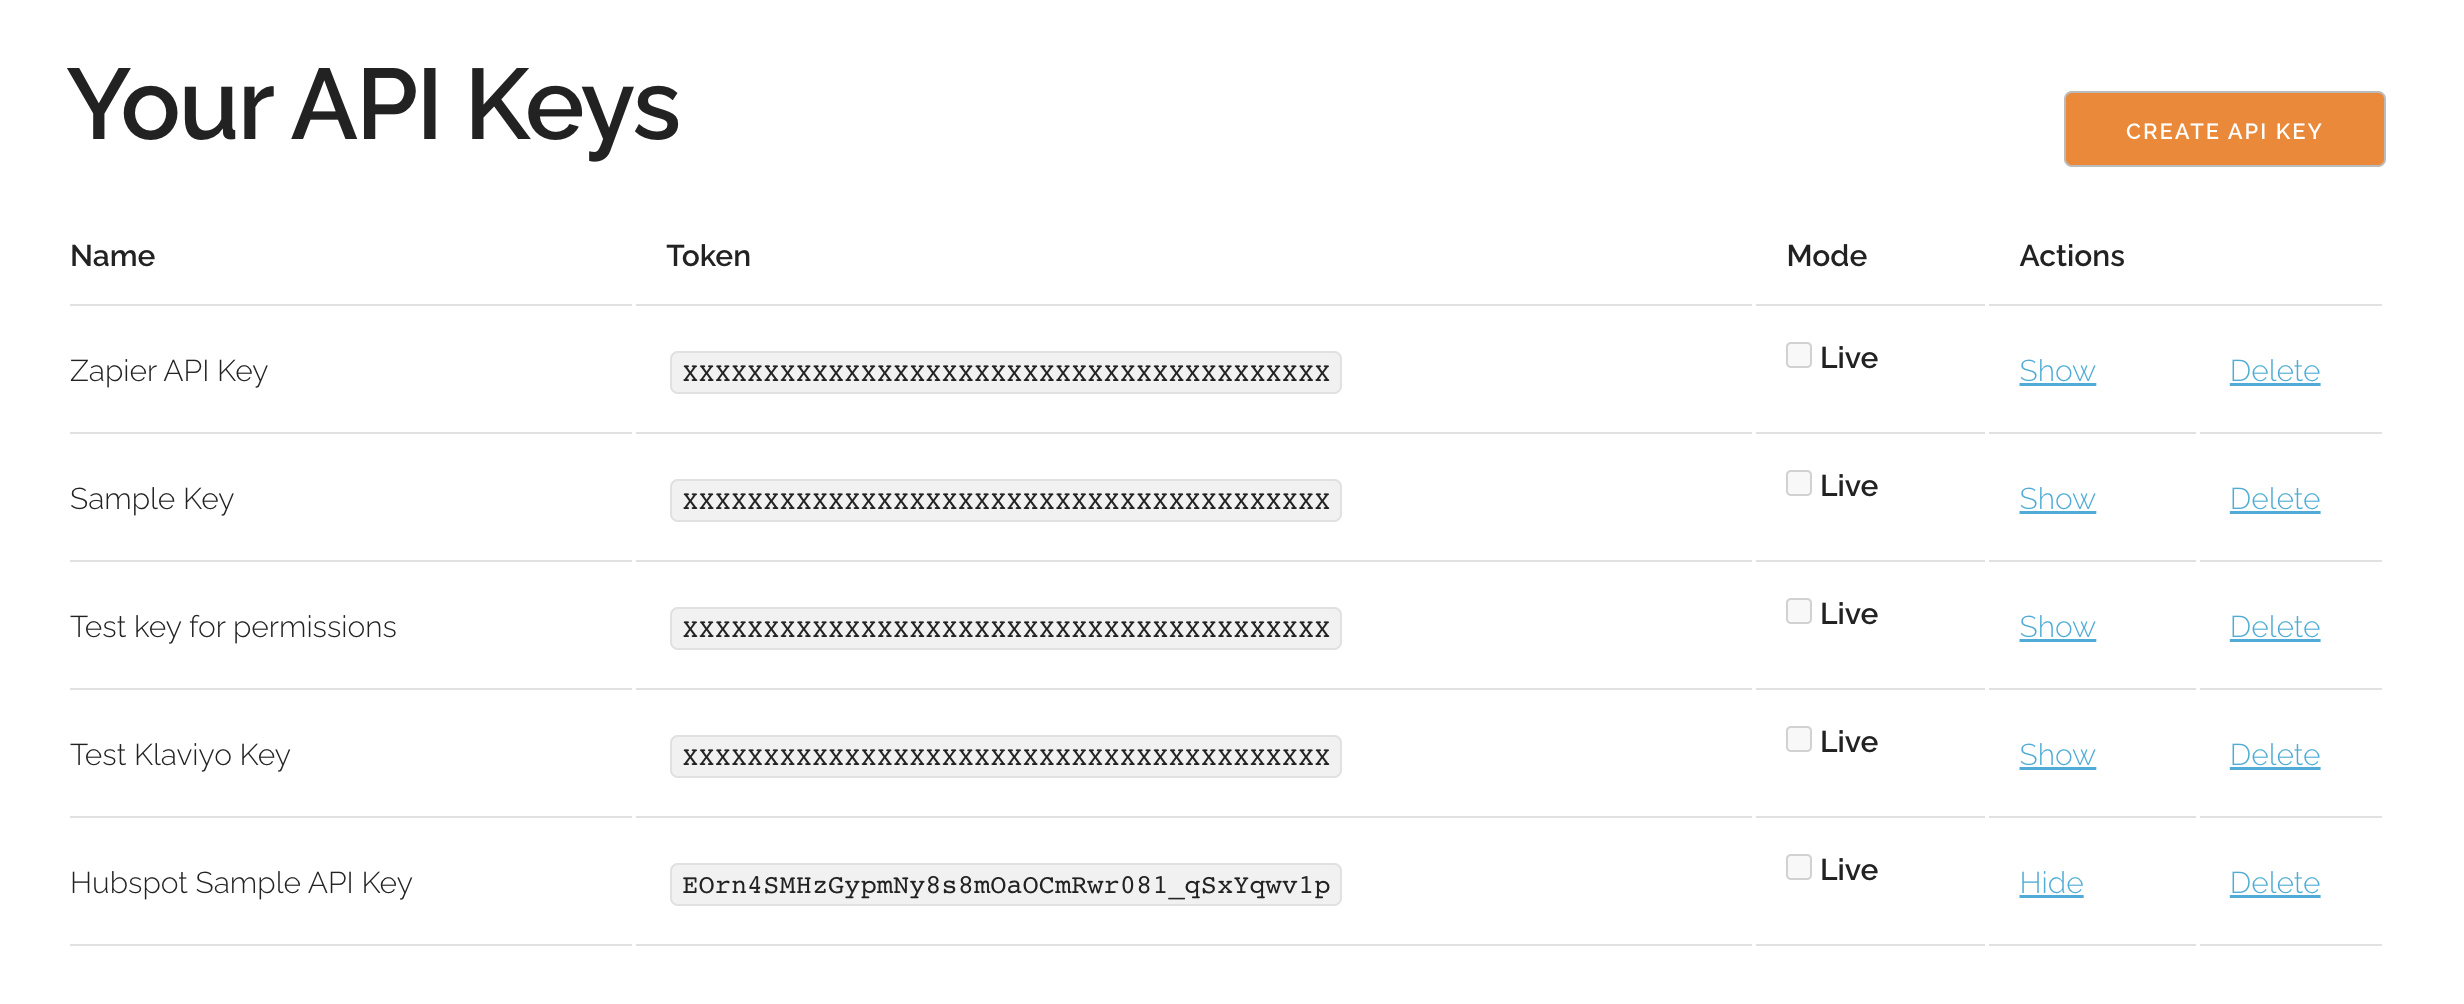
6. First, create an IgnitePOST API key if you don't have one. To do this, navigate to your IgnitePOST Dashboard, hover over your initials in the top right, and click on the 'API Keys' link.
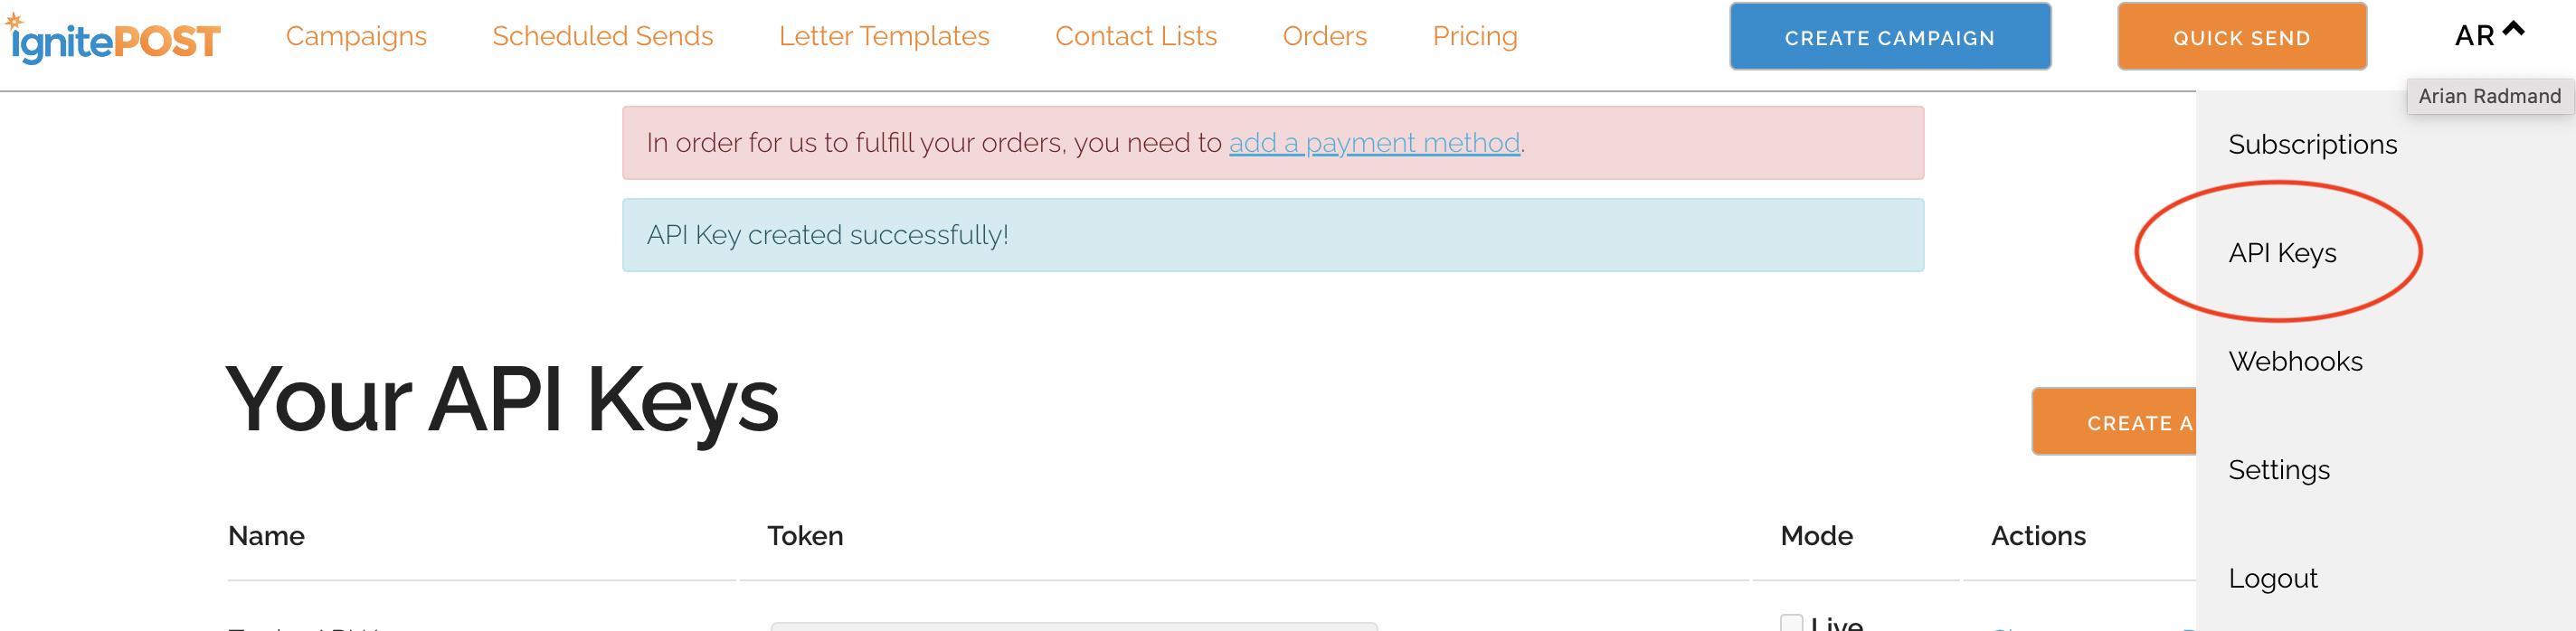
Create an API key if you don't already have one and then copy the token.
In your Hubspot email template, paste this token between the double square brackets ( [[ ]] ) as your API key.
7. Next, you need to tell IgnitePOST what letter template you wish to trigger. We do this by finding the corresponding Letter Template ID.
To find your Letter Template ID, open your IgnitePOST Dashboard, click on 'Letter Templates' at the top of your screen and then click 'View' next to the Letter Template that you have set up.
On this page, if you look at the URL, you will see that the URL ends with your Letter Template ID. For example, if the URL of this page is dashboard.ignitepost.com/letter_templates/32 , then your Letter Template ID is 32.

8. Copy your Letter Template ID and paste this number between the square brackets next to 'letter_template_id' in your Hubspot email template.
Next, fill in the message you wish to send. The easiest thing to do is to copy / paste the message you set up in your letter template on your IgnitePOST Dashboard.
Remember, any values you include in this email template will overwrite the values that you have set up previously in your letter template.
This is your opportunity to personalize your message as well as the other fields with the correct information.
To do this, just click on the 'Personalize' link at the top right of the Hubspot email editor and select the field(s) you wish to use.
Finally, fill in the values you wish to use for the Sender Address fields as well as the recipient address:
9. Next, click on the 'Settings' link at the top of the screen. On this page, make sure the subject of the email is the word 'handwritten' (all lowercase). Be sure to give your email template a descriptive name as well.
Then click 'Review and Update' and be sure to save and publish your email template.

10. Once you have your email template saved, navigate back to your Hubspot flow and make sure this email is being triggered at the point in which you wish your handwritten card to be sent.
The recipient email address should always be 'operator@ignitepost.com'.
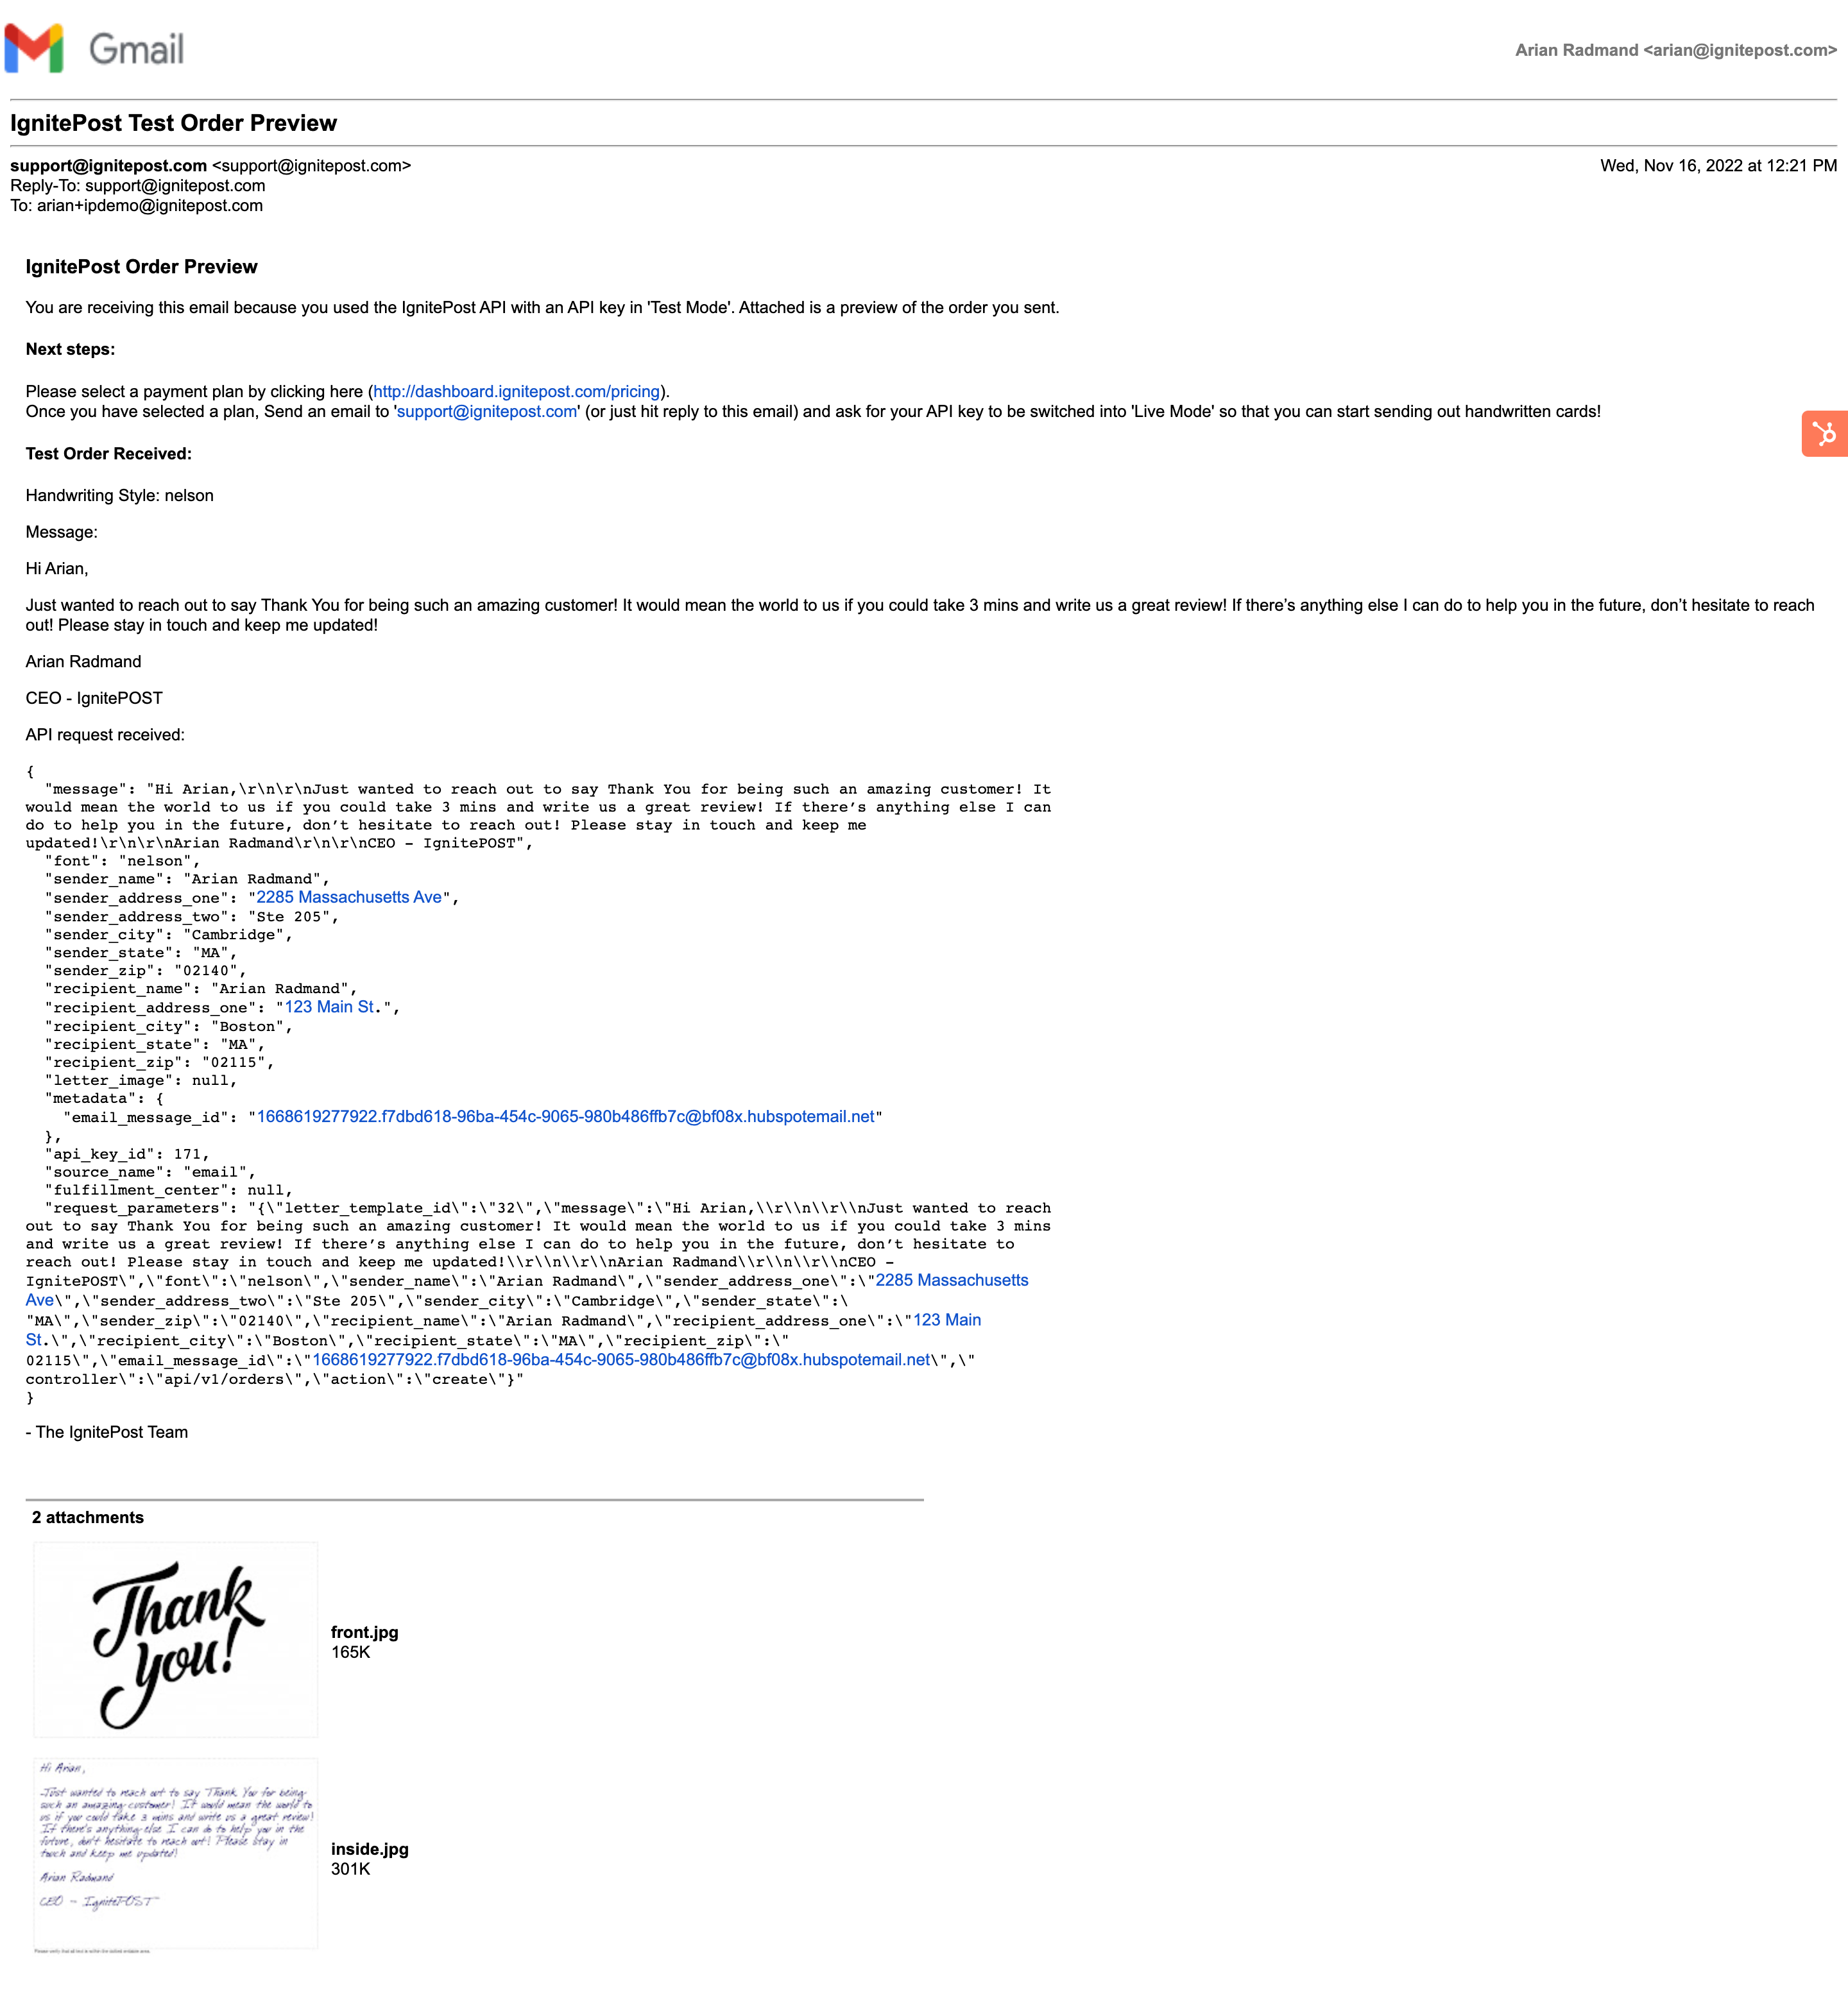
11. Once you have confirmed your email is triggered at the correct time, it's simple to test it out!
We recommend that you put yourself in your flow and trigger this email first. When you do, you will receive an email with a Test Order Preview showing what your card would look like when it is created & sent.
All API keys at IgnitePOST are kept in 'Test Mode' until you tell us to turn them on 'Live', so our recommendation is to let your flow run for a bit, which will trigger these 'Test Mode' order emails each time a card would have been triggered.


12. When it looks like the messages are formatted correctly and you're ready for us to start writing and sending cards, simply send an email to 'support@ignitepost.com' and let us know you wish for us to switch your API into 'Live Mode'.
That's it! You're now done, and have set up the ability to trigger real pen & ink handwritten cards from any point in a Hubspot workflow!
If you have any questions, don't hesitate to reach out to us at 'support@ignitepost.com' and we'd be glad to help you!

.svg)
Read more insights

-min.png)
Get expert insights for real mail campaigns
Everything you need to launch, run and scale handwritten card mail campaigns. Subscribe today!


.png)


Ready to create your first magic moment?🚀
Start using IgnitePOST today. It's free to signup!
No contracts, no commitment and unbelievable support.